Logging into SeaWulf
The login guide offers essential instructions for accessing SeaWulf's login nodes and configuring DUO Authentication. Linux and macOS users can log in via SSH commands, while Windows users can utilize MobaXterm, featuring integrated X server support. It also provides insights into VPN access and tips for managing persistent VPN software such as GlobalProtect.
Before using the system, please familiarize yourself with the login node. Additionally, you must set up DUO Authentication to ensure secure access.
Logging In
Linux and macOS
You may access the SeaWulf login nodes using the respective command-line from any modern workstation via secure shell (SSH) depending on if you'd like to use the standard or milan login nodes. On Linux, simply open your favorite terminal program and ssh to the SeaWulf login node with X11 enabled by issuing the command associated with your desired login node (NetID should be in all lowercase):
This command line is used to access the standard login node
ssh -X NetID@login.seawulf.stonybrook.edu
Whereas this command line is used to access the milan login node
ssh -X NetID@milan.seawulf.stonybrook.edu
On macOS, the same command can be used to ssh to SeaWulf, however installation of XQuartz is required in order for X11 to function.
For more information regarding choosing the right login node, please click here
Windows
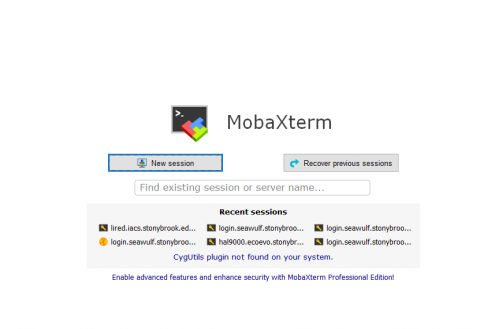
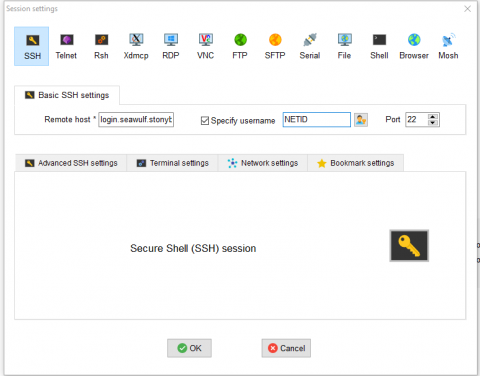
MobaXterm Home Edition may be freely downloaded and installed by SeaWulf users, as long as multiple individuals are not using the same installation. MobaXterm comes with its own X server, so no additional utilities are required to enable X11 tunneling. Login with MobaXterm by clicking the “New Session” button and provide the hostname (login.seawulf.stonybrook.edu) and your username:


DUO Authentication
When you attempt to access the login node by following the above methods, you will receive a notification on your DUO-enrolled device. To finish logging in, please view the DUO notification and approve the login attempt by selecting the green check mark.
If you have not already setup DUO, please refer to our FAQ page on enrolling in DUO first.
DUO_PASSCODE
You can make the DUO authentication process a tiny bit quicker if you use the DUO_PASSCODE environment variable. This allows you to pre-select the DUO authentication method (or “factor”) you want to use instead of manually selecting it every time. So if you always want a DUO push to your phone, you can set DUO_PASSCODE to push, and you won't have to type '1' every time you log in. Also, this variable can sometimes fix issues with SCP/SFTP and other software used for file transfers.
Here are the possible values for the DUO_PASSCODE variable:
| push | Push a login request to your device. |
| phone | Authenticate via phone callback. |
| sms | Get a new batch of SMS passcodes. Your login attempt fails — log in again with one of your new passcodes. |
| A numeric passcode | Log in using a passcode, either generated with Duo Mobile, sent via SMS, generated by your hardware token, or provided by an administrator. |
You can also add a number to the end of these factor names if you have more than one device registered. For example, push2 will send a login request to your second phone, phone3 will call your third phone, etc.
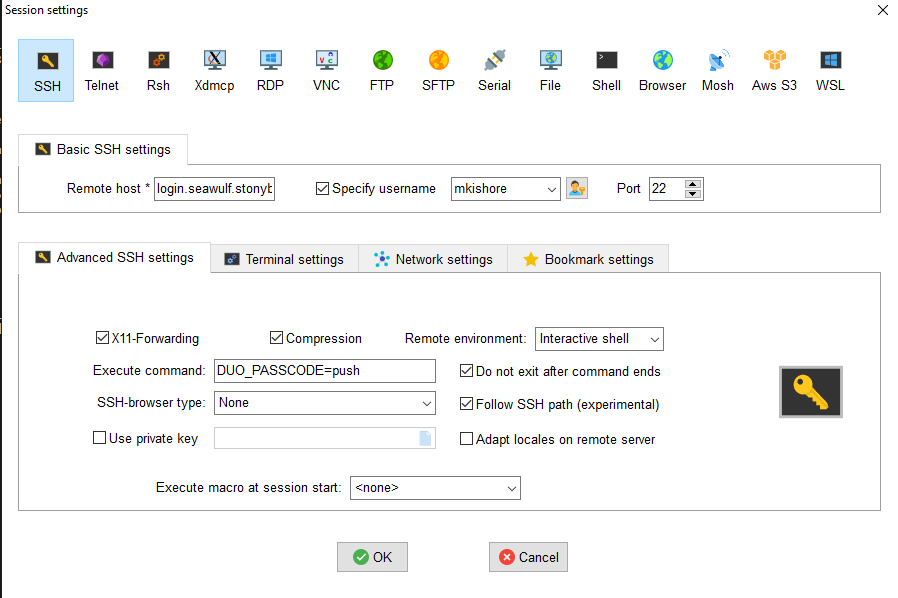
If you're logging in using MobaXTerm, you can set DUO_PASSCODE in your session configuration and also change SSH-browser type to NONE to avoid repeated DUO prompts :

On Mac and Linux, you can modify your local ~/.ssh/config file to include this setting:
Host *.seawulf.stonybrook.edu
  SendEnv DUO_PASSCODE
And then set DUO_PASSCODE from your terminal before you log in:
export DUO_PASSCODE=123456
VPN Access
Depending on your workflow and the software you use, you may find yourself frequently needing to authenticate with DUO. If this gets to be bothersome, consider connecting to Seawulf through Stony Brook's VPN. Information about requesting access and connecting to Stony Brook's VPN. You will need to authenticate once with DUO in order to get connected to the VPN, and then all connections made to Seawulf through the VPN will not require DUO.
You may notice that the GlobalProtect VPN software refuses to close when you're done using it. GlobalProtect is designed as an enterprise-level application, primarily for use by large corporations or research institutions. Keeping the application running at all times is one of the ways that GlobalProtect ensures that all information across the network is kept secure. However, this can feel invasive when constantly running on your personal computer, so here's how to quit the program:
MacOS
Open Terminal, and run this command to quit GlobalProtect:
launchctl unload /Library/LaunchAgents/com.paloaltonetworks.gp.pangp*
Then run this one to reopen it:
launchctl load /Library/LaunchAgents/com.paloaltonetworks.gp.pangp*
You can add some aliases to your ~/.bashrc to make this even easier:
echo "alias loadgp='launchctl load /Library/LaunchAgents/com.paloaltonetworks.gp.pangp*'" >> ~/.bashrc
echo "alias unloadgp='launchctl unload /Library/LaunchAgents/com.paloaltonetworks.gp.pangp*'" >> ~/.bashrc
Now, whenever you open a new terminal session, you can just type loadgp or unloadgp to open and close GlobalProtect.
Windows
GlobalProtect client will restart if you attempt to kill it via Task Manager. Instead, click on Windows and type Services. Open the Services desktop app, look for PanGPS, and stop the service. Start up the service again when you want to reconnect to the VPN.
Setting Up Passwordless Access
Additionally, passwordless access is easily enabled. See How do I set up passwordless SSH? for a short tutorial.
Accessing a particular login node
SeaWulf now has five login nodes available to all users. If you would like to choose which login node you are placed on (e.g., in order to retrieve a saved screen session), you may specify the login node you want by choosing one of the following five hostnames:
login1.seawulf.stonybrook.edulogin2.seawulf.stonybrook.edumilan1.seawulf.stonybrook.edumilan2.seawulf.stonybrook.eduxeonmax.seawulf.stonybrook.edu
If you do not specify a login node when connecting to SeaWulf, a round-robin load balancing system will automatically place you on either login1 or login2.
Please note that screen sessions may only be accessed from the login node on which they were started. When detaching from a screen session, please make note of which login node you are on and specify this particular login node when you access it again in the future.
Additionally, you can access SeaWulf through Open OnDemand (OOD), a web-based interface for interacting with the cluster. For more details on how to use Open OnDemand, please refer to our main OOD article.
Learning About the Login Nodes
Whenever you log into SeaWulf, you will be interacting with the Login Node. To understand what this is, see What is a login node?

